Showing posts with label tutorial. Show all posts

Monday, January 23, 2012

How to make a chain-harness

Of course there are many chain-harness tutorials out there. Those I have seen are just the same, simple design that can be easily found in stores.

This tutorial has a bit of a naughty side, as this design is inspired from a pattern seen in bondage rope.
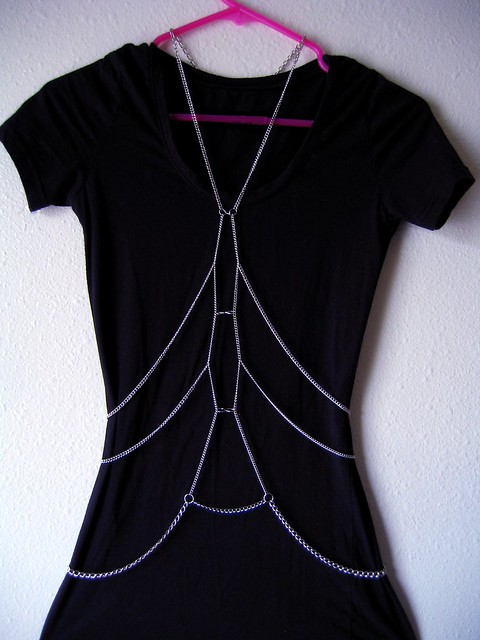
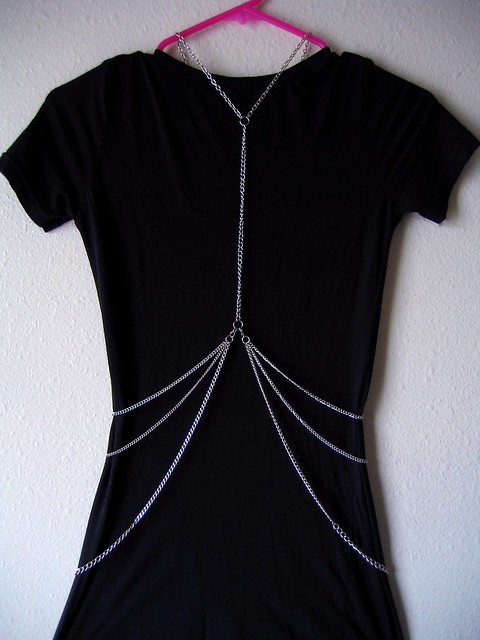
front of harness

I won't tell you what chain to purchase, that is to your taste. I would have used a matte, gunmetal chain but all I had was a shiny, silver colour curb chain from a multi-strand necklace that I took apart. Whichever chain you choose, make sure your jump rings will fit through the chain links, some jump rings are thicker than others so make sure your chain links will be compatible.

(I am a size petite-small, so if you need it a bit longer or wide, just measure out your torso and chest to adjust accordingly, as this is the main area where the chain wraps around.)

Below, I have a "pattern" for this harness tutorial, I call it a little "cheat sheet" this will accompany the written instructions.
The colours in parenthesis next to each item correlates to the pattern.

*If the photos are too small, click on them, they will open up in flickr where you can view a bigger size*
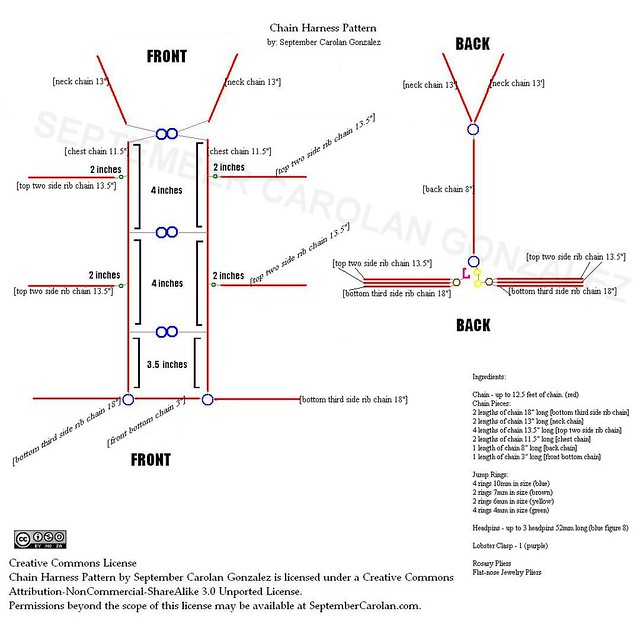
chain harness tutorial pattern


---
Ingredients:
Chain - up to 12.5 feet of chain. (red)
Chain Pieces:
2 lengths of chain 18" long [bottom third side rib chain]
2 lengths of chain 13" long [neck chain]
4 lengths of chain 13.5" long [top two side rib chain]
2 lengths of chain 11.5" long [chest chain]
1 length of chain 8" long [back chain]
1 length of chain 3" long [front bottom chain]

Jump Rings:
4 rings 10mm in size (blue)
2 rings 7mm in size (brown)
2 rings 6mm in size (yellow)
4 rings 4mm in size (green)

Headpins - up to 3 headpins 52mm long (blue figure 8)

Lobster Clasp - 1 (purple)

Rosary Pliers
Flat-nose Jewelry Pliers
A thick or heavy sweater on a plastic hanger or a body form
Table or flat work surface
Towel or soft surface to lay over work space or under "model"
---
This harness can be easily put on and taken off, there is a minimal pattern on the back of the harness to allow such convenience.

You will need to set up your work area. Hang up the sweater for your "model" to build the harness on, or a body form as well as prepare your table workspace with a cloth or thick soft surface (this prevents any ring or piece of chain to bounce off your table if you so happen to drop one by accident while working--it will happen)for the beginning steps of the harness construction.

Also, prepare your chain and jump rings, it is best to open all your jump rings, have your chain lengths measured out, "cut out", and ready to attach. Have your headpins wrapped and formed prior to building your harness, this allows your work to go by smoothly without having to stop everything to open a ring.

As you may have noticed, I am using headpins. These are for wrapping them into figure-8 jump rings. The flat heads are cut off and the pin is wrapped to a figure-8 shape with a width between 5-10mm (whichever you can manage)
It will look something like this, the photo shows it in an open state. In reality, the figure-8 jump rings I made are far from perfect.

figure-8 jump ring

---

There is a lot going on in the visual pattern, so we'll start at the top of the Front.
---
First, get the two lengths of Neck Chain that is 13" and attach one end of each chain to a figure-8 jump ring.

Second, attach the two lengths of Chest Chain that is 11.5", to the figure-8 jump ring that already has the Neck Chain.

Third, measure two intervals of 4" from the top of each Chest Chain, this is where the other two figure-8 jump rings will be placed, place each side of the figure-8 jump rings into the 4" placement of each Chest Chain. The rest of the bottom chain, should be 3.5" on each chain.

Fourth, measure two intervals of 2" from the top of each Chest Chain, this is where the Top Two Rib Chains that are 13.5" will be placed, attach each Top Two Side Rib Chains into the 2" placement of each Chest Chain with a 4mm jump ring.

Fifth, attach a 10mm jump ring into the bottom of each Chest Chain, between these two 10mm jump rings, attach each end of the Front Bottom Chain that is 3" long, to the 10mm jump rings. To the same 10mm jump rings, attach one end of the two Bottom Third Side Rib Chain that is 18" long.

[*This completes the Front portion of the harness.*]

front of harness (detail)

---
(With the Back portion of the harness pattern, Neck Chain, the four Top Two Side Rib Chains, and the two Bottom Third Side Rib Chain are shown as a continuation in the Back portion of the harness pattern)

Back portion of the pattern, at the top.

Sixth, attach the two ends of the two pieces of Neck Chain (that is not attached to the figure-8 jump ring) to a 10mm jump ring. To that jump ring, attach the Back Chain that is 8" long. To the bottom of the Back Chain, attach a 10mm jump ring.

Seventh, gather, from one side each, all the Rib Chains, and link the ends of each Rib Chain, in correlating order of top-middle-bottom to a 7mm jump ring. To only one of the 7mm jump rings that has all Rib Chains, attach a chain of jump rings as follows: 6mm jump ring-to-6mm jump ring. Attach the bottom 6mm jump ring from that chain and attach to the 10mm jump ring that is already attached to the bottom of the Back Chain.

Finally, of the gathered Rib Chains on the opposite side, attach to the 7mm jump ring that has the Rib Chains, a Lobster Clasp. The Lobster clasp will clasp onto the 10mm jump ring that is attached to the bottom of the Back Chain.
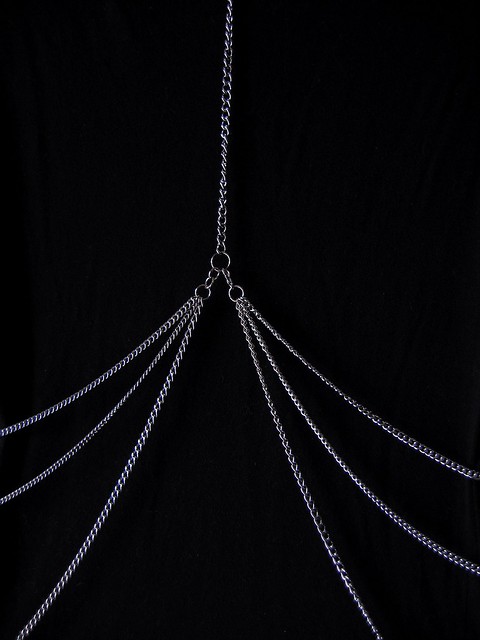
back of harness (detail)

Now you have a cute and naughty chain harness you made on your own! Yay!

front of harness

back of harness


Creative Commons License
Chain Harness Pattern by September Carolan Gonzalez is licensed under a Creative Commons Attribution-NonCommercial-ShareAlike 3.0 Unported License.
Permissions beyond the scope of this license may be available at SeptemberCarolan.com.

Friday, April 02, 2010

Turn Pleated Shorts Into A Gathered Skirt Tutorial (w/pics)

It's been a while since "Jumper Skirt Out Of A T-Shirt" that I've posted a tutorial.
This is not a "made-from-scratch" tutorial, but it's something pattern-makers and seamstresses may appreciate.

Since it is Spring, (if you view my favorites on SeptemberCarolan.etsy.com) you know what is IN this season: Floral patterns!

Enter, this lovely garment. It has one of my favorite floral patterns (Cabbage Roses) that is, for me, very hard to find. So this garment is all I have and what do I notice...they are Pleated Shorts! Yuck!
Photobucket
When I think of a garment bottom made of a Cabbage Roses textile, it should be as feminine as possible. Like a skirt!
So I'm given the choice of letting that specific design of pleated shorts (that I did not like) be made out of a lovely textile.
On top of that, the shorts are too big, so there are no photos of me wearing the them; they are at least one and half sizes bigger than me.
The only pics I could find is a shop photo, in which it looks like a skirt.
Photobucket


Here is a close up of the pleats in the shorts:
Photobucket


I grab the shorts, grab my notepad and write down the fate of this fashion mistake:
Turn Pleated Shorts Into Gathered Skirt:
Keep the zipper
Remove waistband
Remove pleats
Adjust waistband
Remove crotch
Gather skirt
Replace skirt onto waistband

These are essentially the steps, documented with photos and instructions.


You will need:
Shorts
*This tutorial is for a pair of low crotch shorts that are made of 4 panels.
How do you know if they are? There is a seam-line at the center-front, center-back, left, and right sides of the garment.
Of course not all shorts are made like this, but I mainly want to show you how to remove the crotch seams to create a skirt and to work with pleats when you want gathers instead.*
Scissors
Sewing kit
Sewing machine
Seam ripper
Straight pins


Time:
2-3 hours


******


Keep the Zipper
While we are adjusting the waistband and skirt, we are not going to remove the zipper or remove the waistband where the zipper is, this will stay intact.
Why? The factory stitches are fine as they are, it would be a more complicated process to remove and replace the zipper.


******


Removing Waistband
Remove top-stitching and the stitches that attach the skirt to the waistband, do this carefully. Leave about an inch intact at both sides of the zipper.
It took me a while to undo the stitches with my seam ripper, but the work was worth it.
Pictured here is the inside of the waistband and the fusible interfacing attached to the fabric.
You can see the seam at the waistband, the band is made of 2 strips: 1 front and 1 inside. (to be technical, there are 6 strips if you count 3 inside strips and 3 outside strips; that are separated with seams)
Photobucket


Here is the waistband partially removed (remember we are keeping the zipper attached)
Photobucket


Here is a closer look at the waistband and its seams between the strips.
Photobucket


******


Remove Pleats
Now that the waistband is partially removed we can remove the pleats. Luckily for me, they didn't cut off the excess fabric where the pleat was taken in. It generally looks like a pin-tuck. Remove these carefully with a seam ripper.
Photobucket
There are about 10 pleats in this skirt. Each pleat s about one inch. This gives me more fabric to gather up in the waistband later.
You can see the extra fabric in comparison to the waistband, this came out to about 51" of shorts to the 34" of waistband. You can see clearly how baggy the shorts were designed at.
Photobucket


******


Adjust The Waistband
As I mentioned earlier, the waistband was over a size too big for me. It was at 34", to measure where I wanted to skirt to sit (low on my hips) I measured, and I even double measured by wearing a skirt that fit me low on my hips. This came out to 30"
Remove the stitching at the waistband, refer to the photo of the strips and seams of the waistband. This was an arduous task, since so many seams make up the waistband, just work slowly and carefully.
Here is the waistband after the seam was undone.
Photobucket
I only took apart one side of the waistband, since it took me so long to get one seam undone. Plus, I can still make the seam at the waistband even with the untouched seam. This took some planning, I only took in the 4" at the front portion of the waistband and not 2" in at both portions.
Since there were so many seams to sew back together, I hand-stitched all 3 seams that connected to each other with a partial back-stitch, since this is the strongest hand-stitch for permanent seams.
You can machine stitch the waistband back up again with the deducted inches, if you have trouble remembering the construction of the waistband, do what I did and take a few close snapshots of the waistband seams. It helps.
Photobucket


******


Remove Crotch
The shorts are made with 4 panels, this makes it easier to turn into a skirt, since there has to be a seam to take in the crotch of the shorts, (if your shorts do not have a middle-front seam like these shorts do, you can easily make one when you are ready to take in the crotch portion of the shorts)
Remove the stitching at the crotch part of the shorts, where the front and back meet only.
After you have removed the stitches, you will need to find the grain-line, this will help you take in the skirt evenly. You want to match up the grain-line with both panels.
Find where the crotch is, then pin together up until the grainline matches both sides. Here is what it should look like.
Photobucket
Here is the back


Photobucket


You will have to undo the stitches at the hemline as well, so you can connect them later after you take in the crotch.
This is the crotch after I took it in. I also hand-stitched this with a partial back-stitch.
Of course, you can machine sew this together.
Notice that I took the hem out a few inches and stitched through it, so I can re-hem the skirt later.
Photobucket


You can see the stitching clearly, I used a partial back-stitch that is very visible from the back; it looks thick because I used a 4 strand thread for strength.
Photobucket


After stitching in the crotch, cut off the excess fabric and over-lock the raw edge with a sewing machine.
Leave a seam allowance that matches the uncut seams, mine was about 1/4".
Fold the bottom hem to match the rest of the untouched skirt hem. This will take some time and possibly some more trimming, but don't worry it will not show on the outside of the skirt.
Here is what it should look like when you trimmed off the crotch seam and hemmed the new skirt bottom.
Photobucket


Do this to the other crotch seam.


******


Gather Skirt
Now onto the gathering of the skirt.
My skirt had some extra fabric from being too big and from letting out the pleats.
Gathering can be done one of many ways, either using extra strength thread in the bobbin and sewing a long, straight stitch all the way around the top of the skirt and gather by way of pulling the extra strength thread until you evenly gather and pin to waistband.
OR
You can do what I did and hand gathered. This is not a process I recommend to everyone, especially if you are not a patient person :)


For either way: you need to pin the skirt seams to match the waistband seams, since there are 4 panels and 3 seams (including the zipper) pin each one accordingly. With the center front seam, just measure the front waistband from left seam to right, and divide in half; that is your center front of waistband to pin the center skirt seam.
Here is what it should look like when you pin all the gathers.
Photobucket


Here is the entire skirt gathered and pinned:
Photobucket


******


Replace Skirt Onto Waistband
Now that the skirt is pinned and ready to be sewn, sew it the outer waistband flap (right sides together)
Photobucket


When you are finished, place inner flap of waistband down.
Before you pin, make sure the raw edges of the skirt and waistband that you just sewn are pointing upwards (like in the previous photo), so the skirt gathers are not popping up on the outside of the skirt.
Here is what it should look like when you are done pinning the inner flap down on the skirt:
Photobucket


You will sew the top stitching on the outside of the skirt, this is to ensure that the stitching will be along the fold of the waistband. Here is what the top stitching will look like on the outside of the waistband:
Photobucket


******


After you have finished top-stitching, you are done with the shorts to skirt transformation.


I always like being able to alter a garment to my size, or change the style entirely. Especially if the garment is styled in a way that is too dated or wrong for the textile. :)


So you just went from this:
Photobucket


To this!
Photobucket


You now have a cute gathered skirt custom altered to your specifications and ready for Spring! ^_^

Tuesday, January 26, 2010

Jumper Skirt out of a T-Shirt Tutorial (w/ pics)


(the first jumper skirt I made before tutorial)

This was my first tutorial I submitted to Threadbanger.com and CutOutAndKeep.net, it got such a great response that it was featured on CraftZine's newsletter and blog and it was picked #2 on CutOutAndKeep.net's Best of 2008
****************************************
**Jumper Skirt out of a T-Shirt Tutorial**
(Creative Commons Attribution-NonCommercial-ShareAlike 2.5
scroll to bottom for license)

What you will need:
*1 XL (Extra Large) t shirt
*1 pair of scissors
*1 sewing machine
or
*1 good sewing hand
*1 set of straight pins
or
*1 set of glass tipped straight pins (recommended)
*1 Iron
*1 Yard stick, ruler, or measuring tape
*1 piece of tailor chalk, crayon, or water soluble pencil (in a contrasting colour)
*1 Seam ripper, nail scissors, or cuticle remover
***************
Time:

Depending on your experience this project should take:
1 hour. 2 hours at the most.
***************
NOTE: Each step that instructs you to sew; use a number 2 zig-zag stitch to retain stretch in the t shirt.
***************
On your workspace, lay out your shirt; we are going to divide the shirt into three pieces:
the skirt, the straps, and the waistband.


The straps will be cut first.

Step 1.
You will need to remove the stitches from the bottom hem of the shirt. Do this by using either your scissors, nail cutter, or cuticle remover, or seam ripper


Once you have removed all the stitches, it will look like this.

*****************************************
Step 2.

Press open the unstitched hem with your iron.
It should look something like this when you are done:

*****************************************
Step 3.

Measure and mark 5" from the bottom of the newly opened hem and measure and mark 14" across. Cut this rectangle out from both sides of the shirt. *Do not cut up on the fold at the edge of the shirt! This will give you two short pieces*


*****************************************
Step 4.

After you have cut out the piece, you will have a 5"x 28" strip.
Fold fabric in half along the longest side of the strip, pin along the newly cut edge, and cut across along the fold.


Now you have two long strips of fabric.

*****************************************
Step 5.

Fold each piece in half along the longest side, pin, and sew raw edges together.


When finished cut off the excess seam allowance.

*****************************************
Step 6.

With the straps you can do one of three things:
1 You can leave them as they are and not turn them inside out.
2 Press the straps with the hem in the middle
3 Turn the straps inside-out and press seam on one side.

If you decide to turn the straps inside-out:

Attach a safety pin to one end of the straps.
Guide the safety pin inside of the strap as if it were a casing for elastic.
Keep guiding it through until the entire strap has the seam on the inside.


Another look at turning the strap inside-out.


Finally, pin down with glass tipped pins and press flat with iron (starch is recommended) with seam on one side.
These are your strap pieces. Set aside.
*****************************************


Right now your shirt bottom should look something like this. Next is the waistband.

*****************************************
Step 7.

You cut two separate parts from the shirt, one from the bottom of the shirt, another from the top of the shirt.

Measure and mark a 5"x10" (the 10" should be what is left of the bottom)


Cut. Do not cut up along the fold.

You should have a 5"x20" rectangle.
This is your first waistband piece. Set aside.

*****************************************
Step 8.

For the skirt measure and mark an 18"x21" rectangle from the new bottom of shirt, pin both the top and under sides of shirt, cut this out from both sides of the shirt.

*****************************************
Step 9.

Flip over pieces, right sides together, and pin only the longer sides together. Sew the pinned sides.
This is your skirt piece. Set aside.

*****************************************
Step 10.

For the second waistband piece; cut off sleeves from the left-over of shirt, open at seam.


Lay your first waistband piece on top of the largest piece from the chest or back panel of shirt top, pin, and cut around your original waistband piece. These are your waistband pieces.

*****************************************
Step 11.

Each person's size is different so "pinch and pin" sides of waistband to get desired fit. Make sure to leave room for slipping the skirt on. Mark, and sew.

*****************************************
Step 12.

Pleat the skirt to the waistband, remember to pin the side seams of the waistband and skirt together first, to get an even match of pleats.

Pin pleats, and sew.

*******************************
Step 13.

To finish the raw edges, sew a 1/2" hem at both ends (bottom edge of skirt, and top edge of waistband)
*******************************
Step 14.

Attach straps to waistband: about 3" from side seam at the front.
Adjust the strap length to your desired fit, pin straps ends to the back of waist band 3" from side seams, pin.
Sew each strap end at top of waistband seam with a box stitch (a continuous stitch that creates a box with and X on the inside, pictured below)

*****************************************
Final Step!

Try on, make any size adjustments. Since this is made from a t-shirt, there should still be stretch when fitting on the jumper skirt. If not, adjust waistband with an elastic band or a zipper.

Enjoy!

I enjoy mine with a ninja turtle shirt!

Creative Commons License
This work is licensed under a Creative Commons Attribution-NonCommercial-ShareAlike 2.5 Generic License.